Glossary
Life, Death, and You
It is important to know when discussing the intricacies of Haven and Hearth, that nothing is permanent. Everything that is will eventually return to nothing, and that's okay.
Death is an important part of this game, and for some, the most important part of the game. Fear of death, or the excitement of taking life, are driving factors which affect every part of the game. Learning how to work with these factors is key to understanding the game.
Hearthling
All player-made characters are called Hearthlings. Hearthlings start out as Floating Orbs of Purple Energy, and must choose a form and a name before they are burned into the world. Hearthlings start with Base Attributes of 10, and Abilities of 1. A hearthling, much like a human, must Eat, Learn, Rest, and Die. While progressing through the game, not only will your hearthling become more experienced, but you as a player will learn tricks and secrets throughout your time playing Haven & Hearth.
Due to the turbulent nature of this game, it is best to jump right in and start Discovering what this game has to offer.
Life
Creating a Hearthling and spawning in the world is an important first step to play Haven and Hearth. Character creation is more complex in haven than in other games, however, and there might be a few important steps you might miss. Be sure to change your hair style and name your character. If one of your ancestors has passed away, you are able to inherit his skills and abilities, granted the proper steps have been followed.
Some quick steps:
- Travel north, following the path to the river
- Following the right path will make you male, Following the left path will make you female
- Visit the reflecting pool to choose your hair style and color (this is permanent)
- Talk to the wizard to name yourself
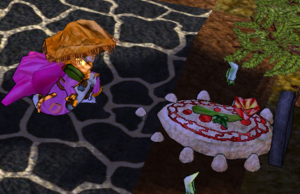
- Interact with the fire to burn yourself into the world
(Optional Steps)
- Visit the graveyard to inherit your ancestor's skills
- Interact with the skull pole to choose Where to Spawn
Knocked Out!
So You've made someone, or something, angry. So angry in fact that They beat you senseless. Fret not! For you may yet escape this encounter with your life.
If in the heat of battle you lose all your Soft Hitpoints, you will be knocked out and receive a nasty Concussion. Upon being knocked out, you have three options available:
- Teleport to your Hearth Fire: This allows the player to escape the battle with their life, but if they have left anything important on the battlefield, such as a Horse, it will not come with you
- Log Out: This lets the character log out where he lays, hopefully to let whatever knocked you out to wander off.
- Warning: You may not log out when Outlawed. Be prepared to fight or die.
- Get back up!: After a minute or so has passed, your character will regain consciousness with 1 SHP.
To note:
- During the minute you're unconscious, any attackers have the privilege of looting your body while you're down. They can take your study items too, including your Bond of Blood and Soil.
Death
Dying is part of the game. Whether you Swim out too far, Get mauled by a bear, or get cut down by your fellow Hearthling, it is best to be prepared for the sweet embrace of death.
As soon as your Hard Hit Points (HHP) hit zero your hearthling will succumb to their wounds and drop dead. There are an uncountable ways to meet your untimely end, but some of the more common ones include, as said above;
- Getting mauled to death. Small animals will stop attacking you after an KO (reduced SHP to 0) but Boars and larger only have a chance of doing so. This means they can either immediately lose interest, continue to beat you for a bit, leave you within an inch of death, or finish you off. However even small animals can easily inflict stacking wounds that make you increasingly vulnerable if not healed. See also: Survive animal attacks.
- When Swimming if you run out of stamina you will start drowning and begin taking Asphyxiation damage at a rate of 20% of your MHP per second. Naturally, after around 5 seconds, your lungs will fill with water and your life will slip away, and you die. Should you die in the water, your corpse will be left floating there. However, if it decays to a skeleton (which takes around a real-life day) all items will fall into the water, so make sure to recover your poor relative's cadaver before that happens.
- If you are an avid miner you may also have experienced a cave-in. Cave-ins get stronger the lower down you go, dealing more HHP damage. A cave-in on a lower level can easily crush your poor hearthling and kill him. Wearing a Miner's Helm can help reduce the chance of death.
- Of course, most strikingly (pun intended), you may meet in your travels another hearthling who is less keen on conversation as he is on destruction. Any character with the Rage skill is able to initiate combat and attack another hearthling, at any time, leaving a Smell of Assault. However, with only Rage, they are capable only of knocking you out, by reducing your SHP to 0, leaving a Stink of Battery. They will not be able to further attack you; once you are KOed, combat stops, and they can't start it again unless you get up.
- However, this gets more complicated if your attacker has purchased Murder. They are able to enter a Murderous Rage, which still does not allow them to continue combat while you are KOed, but it will increase their Grievous damage, increasing the wounds they give you, which may allow them to strike you down and kill you in one extremely vicious blow before you are KOed. But, if you are able to successfully take down your attacker, and KO him, and you also happen to have purchased Murder, you have a choice. Any character who has entered a Murderous Rage, as he has, will not stop combat with another player who has Murder, even if this man in a Murderous Rage is KOed. Indeed, combat will not stop, and if you feel you would like to, you can continue to attack him until he dies. Keep in mind that even though he attacked you, murdering him will still count as a murder.
Inheritance
Death, however, is not the end. While you have lost that Hearthling forever, you can create another and receive a portion of the skills and experience of your deceased ancestor.
Make sure you properly use the Graveyard in Character Creation to receive above mentioned benefits, and so that your new character spawns at your previous one's HF and inherits their possible claim.
If your Hearthling dies, you have several options at your disposal to lament your long lost relative.
Bury your Ancestor
If you have your body, you may bury him to make his passing into the next life easier.
- Not performing any burial rites will net you 15% of your spent LP and FEP (Base)
- Burying your skull without your body will net your 25% of your LP and FEP (10% extra)
- Burying your body without your skull will net you 35% of your LP and FEP (20% extra)
- Burying your whole intact body will net you 45% of your LP and FEP (30% Extra)
Have your People Celebrate your Life
If you were popular amongst your citizens, maybe they will organize a state funeral for you.
- State funerals grant 45% of your LP and FEP without having to bury a body
- This, however, is an expensive option for the most powerful of warriors and diplomats
Honor your Ancestors
If you are diligent and pray often, perhaps your ancestors will forgive your misdeeds and grant you knowledge and wisdom.
- Lamenting the Departed is another substitute for proper burials of deceased ancestors.
- Every time you Lament your departed ancestor, until the maximum inheritance (45%) has been reached, you inherit a percentage (6% per use) of his Attributes & Abilities.
- The Numen cost of lamenting increases by two every time you use this ability (starts as 1 point).
- After reaching maximum inheritance Lamenting the Departed icon will disappear from options.
Memories of Kin
Restores the memory of all characters memorized by your immediate ancestor, but not their Kin status, in a cost of 5 Numen.
Memories of Place
Restores knowledge of all Thingwalls visited by your immediate ancestor., in a cost of 5 Numen.
Memories of the Seen
Restores all Discoveries previously known by your immediate ancestor, in a cost of 5 Numen.
Memories of War
Restores, per prayer, one tier of all Combat Moves previously known by your immediate ancestor, in a cost of 3 Numen.
Important Notes
- Characters cannot be inherited until eight hours after his or her original birth.
- You will spawn on your ancestor's Hearth Fire in case it was not destroyed.
- Using a Wilderness Beacon as usual will override the ancestor's Hearth Fire.
- While not confirmed, safest bet is to bury your ancestor's corpse before starting to eat for FEPs or put LP on Abilities.
Character Sheet
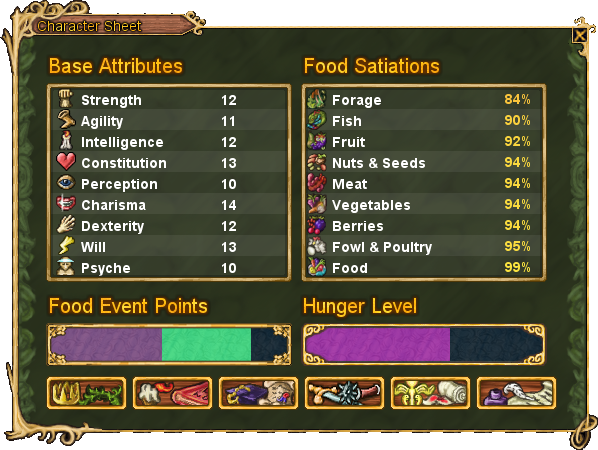
The Character Sheet is where you can learn the most about your character. Essentially, everything about your character is displayed in these menus. this includes stats, skills, quests, and combat moves
Base Attributes
Attributes
Attributes are the most basic stats in Haven, and are gained through eating food and receiving Food Event Points (FEP). Attributes can be both buffed and debuffed by various mechanics in the game, such as wounds, equipment, and certain Activities
Food Event Points
The FEP bar displays the current amount of FEP you have for a specific attribute, as well as how many points are needed to gain another attribute point. Generally, the number of FEPs needed to gain a new attribute is equal to your highest attribute value. For instance, if your highest attribute is strength at 30, then you will have to consume 30 FEP to gain a new attribute point.
Food Satiations
Hunger Level
Each food has a hunger value that adds to your hunger level when eaten. Each hunger level has a lower "Food efficiency" bonuses, but takes less time to return to a lower hunger level. The hunger level of food is a flat rate unaffected by quality..
| Hunger Level | Food Efficiency |
Time to lose 1% hunger |
Time to lose 100% hunger |
Variety Bonus | Variety Example @15 max stat |
|---|---|---|---|---|---|
| Ravenous | 300% | 2 hours | 200 hours | 1.097 | 28.3% |
| Famished | 200% | 1 hour | 100 hours | 0.894 | 23.1% |
| Hungry | 100% | 20 minutes | 33.3 hours | 0.632 | 16.3% |
| Content | 90% | 10 minutes | 16.67 hours | 0.602 | 15.5% |
| Full | 50% | 3 minutes | 5 hours | 0.447 | 11.5% |
| Stuffed | 25% | 46 seconds | 1.25 hours | 0.315 | 8.1% |
| Overstuffed | 10% | 7 seconds | 0.19 hours |
Abilities
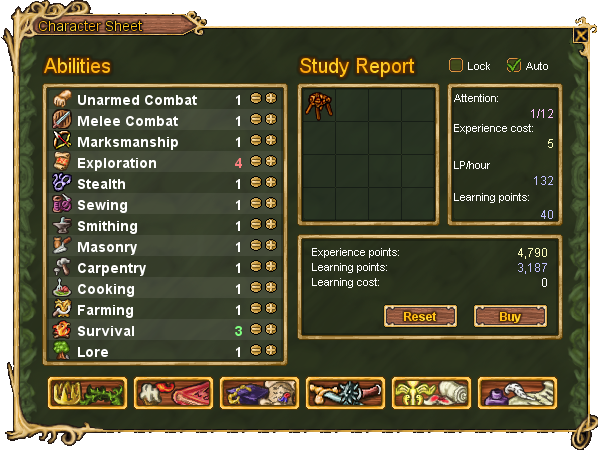
The abilities page details your learned abilities, as well as earned Experience Points and Learning Points. on this page you can also manage your study report, which is where you study Curiosities
Abilities
Abilities are your Learned skills, and as such are bought using Learning Points. All abilities start at 1, and cost:
Learned skills are totally nonrefundable, so choose wisely. Like Attributes, Abilities can be buffed or debuffed by Wounds and Equipment
Study Report
The Study Report is a 4x4 mental inventory, sometimes referred to as your 'mentory', used to study Curiosities at the cost of Experience Points to gain Learning Points. things to know:
- Studying curiosities is a passive activity and will occur automatically as long as curiosities are in your mentory.
- Your Attention is equal to your intelligence, and determines how many curiosities you can study, determined by the curiosities' mental weight.
- You cannot have two of the same curiosities in your mentory at the same time.
- A Personal Claim Bond is kept in your mentory in order to upkeep its presence.
- Presence is added from a percent of lp gained from studying curios. Lp is not consumed from presence being present.
- Once an object is finished being studied, you will receive its learning points and the object will disappear.
For more information, see the Curiosity page
Lore & Skills
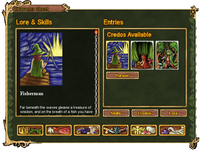
Lore & Skills is where you can evaluate which Skills, Credos and Lores you have discovered or completed.
Skills
Skills are abilities you can purchase which enable you to perform specific actions, such as Boat Building and Mining. Skills cost Learning Points and are permanently in effect once purchased. Skills are hierarchical and as such must be learned in a specific order. Generally, the more advanced the skill, the more Learning Points it costs.
Credos
Credos can be described as professions, which completed provide passive buffs and bonuses. Credos cost Learning Points to initiate, and only one Credo can be pursued at a time. Each Credo has 5 abilities that can be activated in order by completing quests for that credo. Once the Credo is completed, their bonuses will be permanently in effect and you can begin pursuing another Credo. Similar to skills, certain credos require prerequisite credos to be completed before you may begin them.
Lores
Lores are events which occur by playing and exploring. Lores award the player Experience Points, which can then be spent on Curiosities to gain Learning Points. Lores are triggered randomly and it is encouraged to perform a variety of tasks through the day in attempt to trigger as many lores as possible.
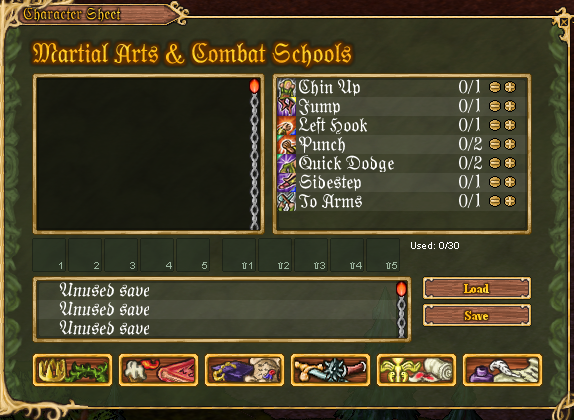
Martial Arts & Combat Schools
Martial Arts & Combat Schools is where you build, save, and examine your combat cards. Combat cards can be discovered by defeating animals in combat, as well as learned from other players.
Things to know:
- Drag and drop cards into combat slots to equip them. each combat deck can hold up to 10 different cards.
- each card has a value of one point, and each deck may have up to 30 points worth of cards.
- You may stack up to 5 of the same card in one deck. Each stacked card adds extra power to the move.
- You may have up to 5 different combat decks saved, for quick switching between decks.
- cards 1-5 are activated with keys 1-5. cards 6-10 are activated with SHIFT+1-5
Health & Wounds
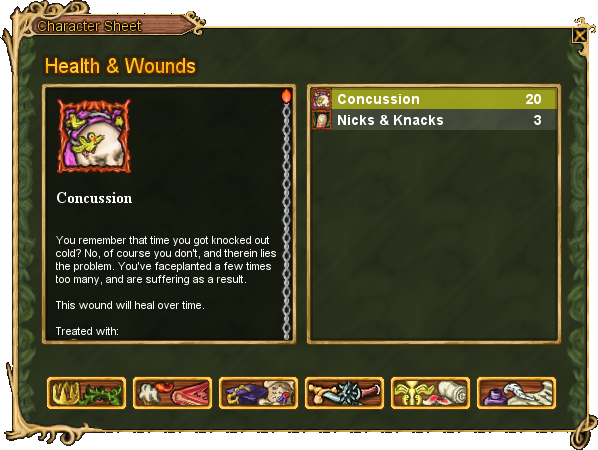
Wounds are semi permanent damage taken through various activies in the game, most notably combat.
The Wounds menu displays your current list of wounds, their effects, and how to heal them. Some wounds may heal on their own, while some might need special medicine or treatments to cure them. The number displayed next to each wound indicated the humber of Hard Hitpoint damage you have received from that wound. When your Hard Hitpoints reach 0, you die. Generally speaking, wounds will not heal unless you have 8000+ Energy
Quest Log
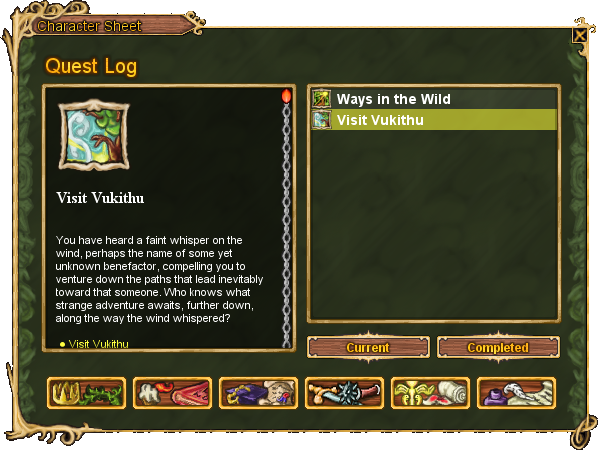
Your Quest Log displays your Current, Completed, and Failed Quests.
Clicking a quest will display quest objectives both in menu and on screen. Having an active quest will display an arrow to the quest givers.
Equipment Screen
- See Equipment for all equipable items.
- Also see Equipment Table for stat boosts equipment.
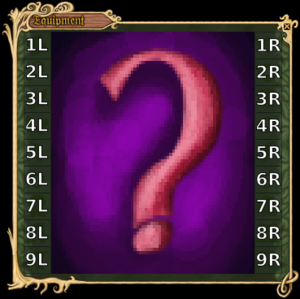
The Equipment Screen is where players can equip their character with items that will help them flourish in the harsh world, or just look pretty. These items include weapons, armor, clothing, jewelry, tools, and healing items. There are 16 slots for equipment. Some items take up multiple slots, e.g. the Bear Cape that takes up both the headwear and cape slots, and the Pickaxe that takes up both hands. Equipment slots are labelled, but many players (especially ones from before they were labelled) refer to them as their slot relating to the row and column, 1L meaning the hat slots and 9R meaning the shoes slot.
Slots on the Equipment Screen
| 1L | Headgear | 1R | Eyes |
| 2L | Main Accessory | 2R | Mouth |
| 3L | Shirt | 3R | Torso Armor |
| 4L | Gloves | 4R | Belt |
| 5L | Left Hand | 5R | Right Hand |
| 6L | Left Hand Pouch | 6R | Right Hand Pouch |
| 7L | Left Hand Ring | 7R | Right Hand Ring |
| 8L | Cloaks & Robes | 8R | Backpack |
| 9L | Pants | 9R | Leg Armor |
| 10L | Cape | 10R | Shoes |
- Note: "Accessory" slot was split into three separate slots in Twinkle-Twinkle (2020-11-16). Due to this, you may find pages or people that refer to shirts taking up 2L/2R when they now take 3L/3R and similar things, so keep that in mind.
Inventory
Your character's inventory is where all items are stored, this is different from the Equipment Screen in that items are not worn on the character.
Your character starts out with a 4x4 inventory grid which can be expanded upon by equipment, adding horizontal or vertical rows of inventory space. It is important to note that these equipment bonuses stack. For example, wearing a Birchbark Backpack and a Merchant's Robe would modify your inventory grid to 5x5. Thus by wearing a leather backpack, merchant's robe, and two traveler's sacks inventory space is 7x8
One essential task of any player is to increase the space available for use. This can be achieved in several ways:
- 1. Non-material.
- 2. Container-buildings.
- 3. Inventory expanders.
- 4. Wearable containers.'
1. Non-material.
Non-material means of increasing inventory space include:
- Account Verification (+1 vertical line permanently for that account)
- Account Subscription (+1 horizontal line for as long are your subscription is active)
- completing the 3rd level of the Nomad Credo (+1 vertical line)
- completing the 5th level of the Nomad Credo (+1 horizontal line)
2. Container-buildings.
Not all things in the game need to be with you constantly. The situation when the subject needs to be preserved for better times is quite ordinary. In this case, container-buildings come to the aid. There are a huge number of them in the game, ranging from the simplest branch baskets to the majestic chests or spacious cabinets. Like any other buildings in the game, they are subject to decay, so they are used as long-term storage facilities at the players' bases, or for short-term transportation of large volumes of cargo. They have their own inventory, which opens with a separate window when you right-click on an object. Many crafting recipes in the game allow you to use ingredients from open containers without removing them.
There are also a number of movable objects (like Knarr or Wagon) that have both their own internal storage space and places for individual portable containers.
3. Inventory extenders.
It is good to store many things at home, but being able to take a lot of stuff on long journeys is vital too. For such purposes, so-called inventory extenders are great - items worn in equipment slots that increase the character's internal inventory (like non-material methods). These include:
- Birchbark Backpack (+1 vertical line)
- Leather Backpack (+2 vertical lines)
- Wanderer's Bindle add +1 vertical line (in the left hand) and +1 horizontal line (in the right hand). Can hold 2.
- Traveller's Sack add +1 vertical and +1 horizontal line for each one taken in hand. Can hold 2.
- Merchant's Robe increases the size of the inventory by 1 horizontal line.
4. Wearable containers.
There is also a separate category of things that can simplify the carrying of certain things. The peculiarity of such items is the presence of their own inventory (as with container buildings), the ability to hold them in equipment slots (like extenders) and narrow specialization in the type of wearable items. These include:
- Toolbelts - 3-25 slots, tools only.
- Hunter's Quiver - 30 slots, arrows only. Can be carried on a belt.
- Keyring - 9 slots, keys only. Can be carried on a belt.
- Wicker Picker - 20 slots, forage only. Must be equipped in either of the "Hand" -slots, can equip two.
- Leather Purse - 6 slots, coins only. Can be carried on a belt.
- Creel - 36 slots, fish only. Must be equipped in the "Cape" -slot.
Separately, it is worth mentioning 2 special inventory extenders:
- Saddlebags are a craft item that can be put on a horse, which allows quick access to its internal storage in 16 slots.
- Packrack is a craft item that can be put on a cow (bull), which allows quick access to its internal storage of 25 slots (and an additional two cells for a liftable load)
Skillfully combining the listed opportunities, you can simplify the processes of storing and carrying important things as much as possible, which will allow you to devote more time to an exciting gameplay.
Important Note: As of world 10, Verified Players receive one bonus row and subscribed players receive one bonus row and column, for a total of 5x5 inventory
The maximum available personal inventory would be 10 x 9 or 90 slots.
10 columns = 4 + 1 for verified + 2 for leather backpack + 2 for both Traveler's Sacks + 1 for Nomad Credo
9 Rows = 4 + 1 for subscription + 2 for both Traveler's Sacks + 1 for Merchant's Robe + 1 for Nomad Credo
HUD
The Heads Up Display (HUD) provides important information about your character's current status.
Hitpoints
Hitpoints are divided into three categories, indicated in the mouse-over as SHP/HHP/MHP.
- SHP
- Soft Hitpoints are your Hearthling's pain tolerance. When this reaches 0, your character is temporarily knocked unconscious. If your energy is over 8000, SHP will recover over time, capped by your current HHP
- HHP
- Hard Hitpoints are your Hearthling's physical vitality. When this reaches 0, your character dies. You can see what is lowering your current HHP in the Health tab of the Character Sheet. Some wounds will heal over time, others may require direct intervention, and yet others may not have any current healing methods short of magic.
- MHP
- Max Hit Points is your character's damage limit. Your HHP can never be greater than this number. It can be gained by increasing Constitution or using a Heart Container.
Stamina
Indicates how tired your character is. This goes down as you perform various activities, eventually making your character move slower as it goes below certain levels. Over time, your stamina will recover by taking points from the energy bar. Naturally stamina regenerate 10% per 10% energy. It can also be recovered with more energy consumption by drinking beverages, such as: Water, Tea, Milk, Wine, Beer or Weißbier.
Your maximum stamina cannot be increased or decreased. Its rate of loss cannot increase or decrease with one exception: Constitution reduces the rate it is lost while swimming.
Your Hearthling generally won't exhaust himself below 10%, if that's reached by doing most jobs like felling trees they will stop just before they reach it.
| Stamina % | Limitation(s) |
| < 50% | Cannot run at 4th speed. |
| < 29% | Cannot Dig. |
| < 25% | Cannot run at 3rd speed. |
| < 10% | Can only crawl. |
| < 5% | Cannot move. |
Energy
Energy is a measure of how much work your character can do. The stamina and health bars are refilled by the energy bar. Energy is mainly consumed when you drink water to replenish the Stamina.You can get more energy by eating food.
- If your energy is 8000 or above, your energy is in "healing" state. This will regenerate your SHP.
- If your energy is 5000 or below, you are unable to do hard labor such as digging soil or mining.
- If your energy is 2000 or below, you will Starve, which will slowly drain your health.
- If your energy is 0, you will start rapidly losing HHP and die very quickly.
Maximum Energy is never lost or gained.
Speed
Speed is how fast your character moves. Generally, the faster you move, the more stamina you consume.
Certain Terrains limit the maximum speed a hearthling can travel on them (on foot).
Other than vehicles or horses, your movement speed will not raise or lower, except when using Speed Boosts and walking up/down slopes, which decrease/increase speed respectively. There is no encumbrance or weight system from having a full inventory or wearing heavy armor.
From left to right:
| Crawl | 1.5 tiles per second. |
| Walk | 3.0 tiles per second. |
| Run | 4.5 tiles per second. |
| Sprint | 6.0 tiles per second. |
Kith & Kin
Kin Shortcut: CTRL + B
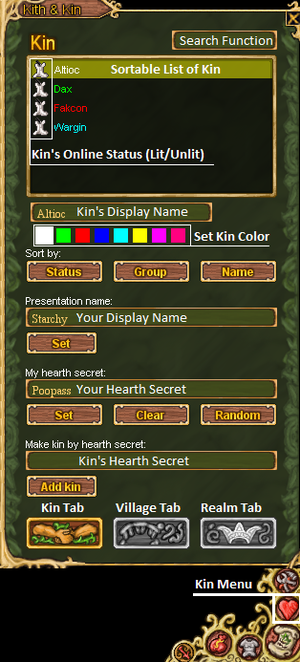
The Kin is the love-heart button. You can add new friends here, view your current ones and quickly see their online status.
In the Hearth Secret textbox, you can create a hearth secret. When you want to make friends with people at long-distance, give them this secret and they will then be your friend, or "kin". Likewise, if somebody gives you their secret, type it in the right text area next to the one you make your own secret in. Note that Hearth Secrets are tied to your hearthling, not to your account.
You can also right click a Hearthling, "Memorize" them, then right-click "Add Kin"
The candle next to their name on the list is their online status - a lit candle is online, whilst an unlit candle means offline. However, if somebody dies, their candle will disappear.
Setting kin colors is an important feature which allows you to group kin and assign privileges, such as theft or tresspassing on Personal Claims or Village Claims
Kin Menu
In the Kin Menu, you can:
- See the online status of kin signified by a lit or unlit candle.
- Invite online kin to a party.
- Privately message your kin.
- Set your own Hearth Secret.
- Add others via Hearth Secret
- Set a Kin's color (Default is white)
- Set a Kin's Display name (For your hearthling only)
As you progress through the game, you may also find yourself cheiftain of a Village or ruler of a Realm. Both of these are also managed through the Kith & Kin Menu, through their respective tabs
Note: The search function is a custom client feature only and isn't available in the default client.
Group Party
A party is a group of players that are able to communicate to each other through a private party chat where each party member is assigned a color.
You can invite a player to your party if you are not in a party or if you are the party leader, and this will make you the party leader. When you leave, another player in your party is assigned party leader, and you can also reassign party leader manually by right-clicking a party member. When the party is reduced to one member, the party chat closes.
Things to know:
- The amount of party members you can have is limited by your Charisma. [Verify]
- Party members used have full access to each other's personal claims, but this was eventually changed to a toggle.
- Also applies to Village Claims, but only if Hearthling with TPP on has "Party permissions" -privilege assigned to them in Village tab of Kith&Kin -menu.
- Colored arrows point towards the positions of party members
- Colored minimap markers give you their exact position
- You can see the portraits of party members on the left side of your screen
- Clicking a portrait will make your character move towards them
Combat
Combat in Haven and Hearth is built around the deck system, with players building a deck of attack, defense and ability cards which are then drawn and selected by the player.
Unarmed Combat
See Unarmed Combat for a more detailed guide.
Unarmed combat is the first close-quarters style of fighting.
Melee Combat
See Melee Combat for a more detailed guide
Melee combat is fighting with a sword and shield or axe.
Initiative Points
Both Unarmed and Melee Combat make use of Initiative Points, sometimes colloquially called coins because that's how they were depicted in Legacy Haven. Some combat moves will give Initiative Points to you or your opponent. These points can then be spent on other, more advanced moves.
Ranged Combat
See Ranged Combat for a more detailed guide
Ranged combat is the simplest technique. Simply equip a Hunter's Bow or Sling,
Experience Points and Learning Points
Experience Points
Experience Points are obtained through Experience Events and Quests and are used by hearthlings for a number of tasks, including:
- Performing Hearth Magic
- Studying Curiosities
Experience Events are not limited, and can be randomly activated throughout your daily activities. The amount of Experience Points received is a good indicator of how often you can activate that event. For Example, Quenching Thirst can be activated very often, while Fragrance of Flowers may only activate every few days. In this fashion, it is recommended or encouraged to perform a number of varied activities or often go exploring to activate these events as often as possible.
- You can check which event you haven't done in Character Sheet under Lore & Skills by clicking on Lore.
- It's worth noting that by using Hearth Magic, you may end up with negative Experience Points when any Curiosities in your Study finish.
- Members of a Realm may be allowed to withdraw Experience points from the Realms bank to use as they will.
Learning Points
Learning Points are used to buy Abilities, skills, and Property. You can currently earn Learning Points (LP) in three ways:
Discovering new objects
- For example: picking your first branch off a tree will give you some LP, digging soil, clay for the first time will award you LP. This is the main source of LP for a new character.
- Some actions that generate large sums of LP:
- Picking tree products: branches, bark, fruits and seeds, boughs. Every individual seed grants a discovery.
- Chipping stones: Every individual stone and mineral grants a discovery.
- Picking forageables such as Spindly Taproot or Blueberries
- Fishing - every type of fish caught will give you some LP
Side Note: Items your ancestors have discovered won't give you Learning Points. You'll get that LP (with the reduction from death) and the crafting unlocks automatically upon inheriting.
- Curiosities are items that can be crafted, foraged, caught, or created as a side effect of doing certain activities. They are studied over time in your Study Report, and will give you LP after completion. They will also consume some experience points.
Killing Animals
- Hunting and killing animals in combat gives a small amount of LP, roughly equal to how much damage your character inflicted on the creature
- Do note that the amount of LP received will reduce if you continuously kill the same creature.
Learning Ability
Learning Ability modifies the amount of Learning Points you gain from studying curiosities. Learning ability can be gained from realm buffs and equipment, such as ROB's. 10 points of learning ability equals to 1% of increased LP gain. [Verify]
Quality
See Quality for more detailed information
Almost all items, as well as many game-world objects, have a quality factor Q, which may range from 1 to ∞, with a standard default quality for most objects of 10 -- for example, all natural-growing trees are Q10.
In general, higher Q items are simply better: high Q weapons do more damage, high Q food provide more FEPs, high Q armor provides more protection.
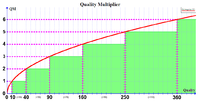
The in-game effects vary from item to item, with some items like buckets and barrels not having any effect at all. Where quality matters, it usually takes the form of the quality multiplier QM:
This multiplier is 1x for Q10, 2x for Q40, 3x for Q90, 4x for Q160, and so on. It is a nonlinear increase, which means that it becomes harder and r multipliers. Since Q10 has a QM of 1x, in many places on this wiki you will just see stats given for Q10 objects. You should assume this unless the wiki page you're reading says otherwise.
Softcap
Softcap is a term describing the effect of an ability or attribute on the quality of a product.
Softcaps are put into effect when the quality of a product would be higher than the skill in question. The quality of said product will then be averaged with the softcapping skill level to get the products final quality. The softcapping skill may be a single attribute or skill value, or a combination of several. If the expected quality of the product will be lower than the softcapping skill, the quality will remain unchanged.
Note:
- If more than one stat softcaps a product, the stats combine with a geometric mean, not an arithmetic mean. For example, for two stats being factored: , for three , etc.
- Quality of built objects is solely determined by the quality of their parts. Softcaps do not apply.
Example:
- You are creating a Treeplanter's Pot with clay of average quality 36. However, the quality of a Treeplanter's pot is softcapped by Dexterity.
- Thus:
- If your Dexterity is greater than 36
- Resulting pot will be Q 36
- If you Dexterity is less than 36
- Resulting pot will be Q (36 + Dex) /2
Hardcap
Similar to Softcap, Hardcap is a term describing the effect of an ability, attribute or the used Tool on the quality of a product.
Hardcaps take effect when the quality of a product would be higher than the hardcapping factor. In which case said product quality will equal the hardcapping value.
Example:
- You are searching for the best quality clay in the area. The clay you are digging up starts at q12 and slowly starts climbing up as you search around. The peak quality is actually 36, but you have a Masonry skill of 20. Eventually, you get up to q20, but it doesn't seem to go any higher than that. It could be the quality capped out at 20 for that area, but it is also possible that your Masonry skill prevents you from getting any better quality.
- Thus:
- If your Masonry is greater than 36
- All clay dug up will be its true quality
- If you Masonry is less than 36
- Resulting clay can at most be equal to your Masonry.
Player Actions
Player actions constitute the variety of tasks and abilities the player can do or act upon the world. The player will start with only a few actions and will gradually learn more actions as they progress and learn more skills.
 Adventure is the first menu 'tab' which holds many of the actions a player can act on the world, such as Destroy and Lift
 Haven & Hearth holds the abilities to Claim Land, Build a Heartfire, and Teleport to your Hearthfire
 Allows you to build a Personal Claim and Claim Land
 Allows you to build a new Hearth Fire, which acts as a spawn point
 Allows you to teleport to your Hearth Fire
 Smoke & Fire Holds some basic fire related items
 Landscaping Holds all your Terraforming Actions, including Plowing Fields and creating Land Surveys
 Hand Plow Allows you to plow dirt manually for Farming before you have built a Wooden Plow or Metal Plow
 Lay Brick allows you to pave the ground with Bricks
 Lay Metal allows you to pave the ground with Metal
 Lay Stone allows you to pave the ground with Stones
 Plant Grass allows you to plant Grass Terrain with leftover Seeds
 Stomp to dirt allows you to turn terrain back into Dirt
 Survey Land allows you to create Surveys, which let the player raise, lower, and level terrain easily.
 Toggles are a set of permissions and abilities that you can either turn on or off
 Criminal Acts allows you to toggle on the ability to freely commit Crimes
 Party Permissions allows you to toggle whether or not your Party has the same permissions as you on a claim
 Swimming toggles whether or not you will freely swim through water
 Tracking toggles whether you actively see Scents throughout the world.
 Allows you to destroy objects and structures
 Allows you to dig the earth for Soil
 Allows you to Fish
 Allows you to inspect objects and structures to extra information
 Allows you to lift objects over your head and carry them.
 Allows you to mine cave walls for Ore and Stone
 Allows you to repair Decayed objects and structures with materials
Miscellaneous
Maps and Tiles
Haven's basic ground unit is the tile. Roads for example are paved in 1x1 tile sections.
The game also used the following tile-based structures. The minimap: 100x100 tiles, and the supergrid: 50x50 minimaps. The whole haven world is build out of X*Y supergrids. Like 9x9 supergrids for world 15 & 16 for example.
A hearthling can directly see a bit more than one minimap around them when it comes to the terrain (indirectly always the 3x3 minimaps, around the minimap the hearthling is in, in the map-viewer). For items, objects and creatures a hearthling view its a bit less than one minimap.
Supergrid note: Most game features cross supergrid borders unhindered. With the known exception of heat. Heat is notable produced by Mound Beds, fires and some other active objects. Heat will melt winter related snow and ice in the low lands.
Additional tech stuff: When it comes to what a heartling can see, in the main-view, the game uses a sub-grid system (or lanes inside the minimap). This system determents what is shown based on which sub-grid the hearthling is standing in. For the terrain it used 4 sub-grid lanes per minimap for this (25 tiles/lane). And it will show 5x5 terrain sub-grids around the related sub-grid the hearthling is in. For Objects (tree's, houses, other heartlings, etc) it uses 11 sub-grid lanes per minimap (9.09 tiles/lane). While displaying 9x9 sub-grids around the related sub-grid the hearthling is in (this range is usually highlighted around the heartling in the minimap).
Day and Night Cycle
The Day and Night cycle functions similar to the real world, except roughly 3 times faster ([Exactly 3.29 times faster]). This means every 24 Haven hours are equivalent to roughly 8 Real hours. Day, Night, and time in general serve important functions in Haven. The most notable effect is the absence or presence of Light. Day is four real-life hours, while night is the same. Sometimes at night there will be less light than usual, this is because the moon follows a Lunar Cycle. On a new moon there will be barely any light. When night falls a hearthling will be forced to light fires or any other Light Sources to be able to see.
Along with dynamic lighting, other features are dependant on time. These include:
- Certain items spawn at certain times, such as the Dewy Lady's Mantle
- Certain Experience events can only trigger at certain times.
- Certain Fish spawn at certain times.
- Many activites are behind time gates to ensure balance playing, such as:
- Curiosities, Silkfarming, Tree farming, Smelting ore, and more.
Game Clock Details
The in-game clock, date & (virtual)time parts, mimics most normal/real date & time concepts. (ie: 24 hours:60 minutes:60 seconds)
Although the default client only shows you some of them, mostly by means of dynamic graphics. It only specifically tells about the day, month & year when hovering over the game-clock.
For additional calendar part see Seasons#Year_cycle.
Decay
Decay is a system of deterioration of structures, commonly measured in Decay Hits (although the measure itself isn't very specific).
There are four main Decay patterns that can be observed:
- Resilient Structures: These items do not decay at all if placed on paved ground within Personal Claim or Village Claim with authority. This category includes all immobile structures and most containers (Cupboard being notable exception).
- Indoor Structures: These items are safe from decay only if placed inside buildings or caves/mines, wherein they will not take any decay hits. This category includes most moveable structures and some containers.
- Fields and Terrain: Sometimes referred to as decaying, these actually transform into different terrains. Specifically Tree radius (and so tree-cutting and planting) and field plowing enables such changes. It happens regardless of claim coverage.
- Carcasses: These always decay, there's no way to prevent it. All unprocessed or skinned carcasses are subject to it.
Decay hits are completely random. Currently there is no good way to measure when decay hits will happen.
Quote from Jorb:
Jorb November 7th, 2010: "Decay Is gone. For everything that stands on a claim, with the exception of things that need to stand on pavement (Immobile structures), which will still decay if they are placed on a non-paved tile. (A claimed kiln will decay if built on dirt for example). Portable stuff that should typically be placed indoors still decays while outdoors. For example: Anvil, Wardrobe, Cupboard, Spinning Wheel, Loom, Meat Grinder, Coinpress. That may or may not be all."
Soak
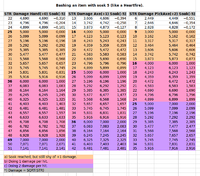
Soak is a value assigned to buildings that determines how resilient they are to destruction.. This value is subtracted from all incoming damage to the building in question. In order for an attack to have any effect at all, it must deal one whole point more damage than the soak value of the building being attacked. For example, aggressive boars and bears deal more than 25 damage per attack. Therefore, can damage and potentially destroy any building in their way with a soak value of less than 25.
Easy way to calculate minimal required strength to destroy an object with soak:
= required strength
Where tool is: 1 (Axe), 2 (Pickaxe), 4 (Sledgehammer), or 20 (Battering Ram). Note that rams can be operated by multiple characters, further lowering required strength.
The final damage that is inflicted to the target structure is the .
See the table image for a visual representation of how tools effects the strength requirement.
See the Property:Soak page for all items with some soak data.
Size
How many squares an object takes up. The first number refers to the x or horizontal direction, the second to the y or vertical direction. When talking about objects, size refers to how much inventory space it takes up, whereas when talking about structures it refers to the number of tiles it occupies.
Fuel
Fuel comes in a variety of forms. Some items can only use certain types of fuel, others can use any form. Each type of fuel burns for different lengths of time, called a "tick" One tick has a length of approximately 4 minutes 50 seconds. The exception being the Steel Crucible, where one tick is 40 minutes long.
Fuel is used to power a variety of items.Cauldrons, Crucibles, Kilns, Ovens, Ore Smelters, Finery Forges, and Steel Crucibles all require different amounts of fuel.
The forms of fuel with the number of ticks are:
 Branch           -- 1 tick
 Coal, Black coal -- 1 tick for Ore Smelters, Steel Crucibles and Finery Forge
 Coal, Black coal -- 2 ticks for all other workstations
 Block of Wood    -- 5 ticks
 Tarsticks        -- 20 ticks








![{\displaystyle QualityCap={\sqrt[{3}]{Stat_{1}*Stat_{2}*Stat_{3}}}}](https://en.wikipedia.org/api/rest_v1/media/math/render/svg/e53516dfc86e8fcebbe32e435dfece9a62ce38ce)
